

Editor’s Note: The following is an excerpt from the first lesson of Dave Holston’s HOW Design University course, Managing a Web Design Project from Start to Finish. In this course, Dave Holston teaches students about the key research and planning phases that inform the online design process, and about project management tools and techniques that can create efficiencies for you as a manager. In the end, you’ll walk away with the ability to deliver a website that is strategically focused to attract, engage and convert visitors.

photo from Shutterstock
As designers, we often think of the Web in terms of wireframes, content management systems and code. But savvy designers know that the success of a Web design isn’t determined by the code, social media integration or cool visuals. Designing a winning website requires a well-thought-out online strategy focused on reaching organizational goals — that can be anything from attracting visitors to buy products to getting the public to understand an issue to introducing visitors to a new brand.
As a designer or project lead, you can become one of the most valuable and influential members of the Web team when you understand how to develop an online strategy. There are many people who can write code and have opinions about the design and nuances of the site, but few have the array of talent and tools needed to create a Web site that helps an organization achieve its goals. This course will provide you with the fundamental tools you need to lead a successful Web design project. Rather than focusing on HTML, CSS or programming, we will focus on the key strategies, content and design elements that go into creating a strategic Web presence.

photo from Shutterstock
Phases of the Web Process
The Web design process is not unlike other communication processes. If you are familiar with developing a creative brief, a public relations plan, a communication plan or a new product, the phases will look very familiar. The phases of the Web design process include the following steps.
Project Definition
Organizations have a need to communicate to stakeholders their positions on issues and make audiences aware of their products and services. Many times the communication need, such as a Web site, is triggered by a change of strategic direction or a new offering. Identifying the reasons of the site’s existence and what it is supposed to achieve are the first step in the process. The goals and objectives that are established at the outset of the project inform all future decisions, from site structure and naming conventions used in the navigation to the visual design of the site.The first step in the definition process is interviewing the organization’s stakeholders to identify the strategic goals of the site, understand key audience needs and identify key competitors. The goal of the definition step is to identify three measurable key outcomes that are directly related to the strategic goals of the organization. The challenge in this step is limiting the number of goals. Most organizations will have more goals than they know what to do with, and each department believes their individual unit’s goals are the most important. Being able to bring focus to organizational goals will make developing the site easier and make the final product more effective.
Once all the information and assessments gathered from the stakeholder interviews are completed, they should be collected in a well-formatted project brief. (The assignment for Lesson 4 will contain a project brief outline you can refer to.) The brief contains the following elements.
- Project summary: Outlines the general overview of the project, organizational background, the environment the organization exists in, the people the organization serves and the unique value it provides to its audience.
- Goals: What are two or three specific measurable goals that the site should achieve? Clear goals allow the Web team the ability to focus on what will provide the most impact and move the organization forward.
- Target audiences: Who will help the organization achieve its stated goals? Most organizations speak to multiple organizations (such as customers, stakeholders, internal audience, suppliers, partners, shareholders and/or government institutions). Audience profiles include demographics, psychographics, brand perceptions, audience needs, online goals and tasks routinely performed.
- Messages: What are the key messages that attract and motivate key audiences to engage with the organization? What are the key brand messages that help differentiate the organization from its peers?
- Competition: Who are rival organizations that provide similar offerings to your audience? Include an overview of competitive organizations’ Web sites, considering visual branding, messaging, navigation, calls to action and key differentiators.
Project Scope
Defining the scope of the project is a critical step. One of the most common frustrations with Web projects is scope creep. By creating a well-defined project scope plan that outlines specific activities and deliverables, along with specific timelines, you will be able to clearly set expectations for your clients. One of the most common ways of tracking Web projects is through the use of a Gantt chart. A Gantt chart not only outlines major activities but also the tasks associated with each activity and start and end dates. The Gantt chart provides a visual reference for the team, showing the timeframe of each step and the dependencies between steps. The Gantt chart also creates accountability between the Web team and the client (which could be an outside client or simply your boss), letting the client and the team know that the delivery schedule is dependent on everyone hitting their marks; if someone misses a date by a day, the schedule shifts by a day.
Wireframes and Site Architecture
Site architecture includes the sitemap and wireframes of pages. Creating the sitemap ensures that you’ve considered all the key pages in the site, showing their relationship to each other and defining how the sties overall navigation should be structured. Wireframes provide a detailed view of the content that will appear on each page. Although they do not show any actual design elements, the wireframes provide a guide for defining content hierarchy on the page.
Visual Design
Once the blueprint for the site has been defined through the creation of the sitemap and wireframes, the next step is to create a visual style. The overall visual style will most likely be determined by the visual brand of the organization; the goal being to connect the Web with all other forms of the organization’s communications. The organization’s brand plays an important role in this part of the process, as designers will want to visually convey key brand perceptual ideas within the design.
Site Development
With designs approved, it’s time to flesh out the design of the pages, develop new content and refine old content, create videos, slideshows, podcasts and other media that will appear on the site as well as start to build out the HTML and CSS of the site.
Site Testing
Before the site is launched, it will be placed on a production server where only internal audiences and anyone who you share the link with can view it. Testing of the site is critical as there will inevitably be issues that need to be addressed before the site goes live. There is nothing that erodes a brand more than a site that doesn’t function properly or that has misspellings or broken design elements. At this stage the site will need to be reviewed on multiple browsers (Firefox, Safari, Internet Explorer) and multiple devices (laptops, tablets, and mobile) to see if and where breaks occur.
Launch
The big day. You’ve tested the site, had it reviewed and approved by the project stakeholders, and you’re ready to launch. But once the site is launched, the project isn’t over — you should be prepared to address feedback from users adapting to the new site. Expect to make some immediate changes to the site, such as fixing broken links, editing copy and making adjustments. The Web is a fluid medium that changes on a daily, if not hourly basis — change is inevitable.
Site Maintenance
Websites are living, breathing entities and need constant care and maintenance. Updating content, making changes to the backend and fixing broken links are all in a day’s work.All of these phases are critical to the Web design process. But the thread that runs through the process is strategy: the desire to achieve a goal, to move the organization forward, to prosper in a competitive environment. Let’s take a look at what strategy is, how it is formulated and how it translates to the Web.
how to build a website from scratch?
How to Make a Website From Scratch (HTML, WordPress, or Builders)
As the owner of a small wedding planning startup, a friend of mine didn’t have a lot of time or money to put into learning how to make a website – but she knew she needed one, or her business would be near invisible. Despite her lack of programming skills, she went full speed ahead into single-handedly creating her online presence.
Starting a website from scratch was actually not the daunting task she feared. With the right tools, she got a WordPress site up and running within a couple of weeks. After the initial buildout of the site, she continued to expand and update it herself as her business grew.
As her experience illustrates, anyone can learn how to make a website with relative ease. It’s as simple as purchasing web hosting and a domain name, then fine-tuning your design through a website builder, WordPress, or using bare-bones HTML. We’ll walk you through each step below, so feel free to click on one of the links here to skip ahead.
Step 1: Choose a Host and a Domain
The first step to creating a website, no matter which approach you decide to use, is selecting a web hosting service and a domain name. The web host is the company that provides the server and storage space for your site and gives the online world access to your brand. The domain name, on the other hand, is the URL (e.g., www.hostingadvice.com) that people use to navigate directly to your site.
Choosing a Host
This is the super easy part. The web’s top-rated hosts have pulled out all the stops to expedite and alleviate the initial website creation process — often beginning with a complimentary domain name registration, single-click installations for popular CMS and blogging platforms, a free website builder, and marketing credits.
To get started, we’d recommend signing up for a web hosting plan with one of the following providers. Your web server will be set up immediately, and most give you a free domain name of your choosing as well. Once you’re signed up, you’ll be building your website in no time:
Bluehost.com

- Known for high performance at a low price
- Endorsed by WordPress.org team
- FREE Weebly site builder and CloudFlare CDN
- FREE domain and unlimited storage
- Get 63% off today (was $7.99/month)
- Get started on Bluehost now.
Bluehost: Our Expert's Review

| Money Back Guarantee | Disk Space | Domain Name | Cheap Hosting Plans |
|---|---|---|---|
| 30 days | 50 GB - Unlimited | FREE (1 year) | www.bluehost.com/shared |
Hostinger.com

- Unlimited everything, from bandwidth to databases
- FREE site builder & WordPress performance upgrades
- FREE daily or weekly backups
- 90+ auto-installation scripts and custom control panel
- SSH access & SSL certificates
- Get started on Hostinger now.
Hostinger: Our Expert's Review

| Money Back Guarantee | Disk Space | Domain Name | Cheap Hosting Plans |
|---|---|---|---|
| 30 days | 10 GB SSD - 30 GB SSD | FREE (1 year) | www.hostinger.com/shared |
InterServer.net

- $0.01 for the first month, then $5 monthly after
- NO annual contracts and NO sudden price increases
- Unlimited storage space, data transfers, and email
- New domain is $11 with 1-month plan ($1.99 otherwise)
- 99.9% uptime and price-lock guarantee
- Get started on InterServer now.
InterServer: Our Expert's Review
| Money Back Guarantee | Disk Space | Domain Name | Cheap Hosting Plans |
|---|---|---|---|
| 30 days | Unlimited | New or Transfer | www.interserver.net/shared |
A2Hosting.com

- FREE Cloudflare CDN and SSD speed boost solution
- A2-optimized caching and 1-click CMS installs
- Up to unlimited email addresses, domains, and databases
- Advanced security features and FREE HackScan
- 24/7/365 Guru Crew support via phone, chat, and tickets
- Get started on A2 Hosting now.
A2 Hosting: Our Expert's Review

| Money Back Guarantee | Disk Space | Domain Name | Cheap Hosting Plans |
|---|---|---|---|
| 30 days | Unlimited SSD | New or Transfer | www.a2hosting.com/shared |
iPage.com

- Featuring easy setup and superb reliability since 1998
- FREE domain and FREE Google marketing included
- Unlimited disk, bandwidth, and emails
- FREE site builder and shopping cart
- Get more than 75% off today (was $7.99/month)
- Get started on iPage now.
iPage: Our Expert's Review

| Money Back Guarantee | Disk Space | Domain Name | Cheap Hosting Plans |
|---|---|---|---|
| 30 days | Unlimited | FREE (1 year) | www.ipage.com/shared |
Choosing a Domain Name
Registering a quality domain name is essential to helping people find and remember your site. The web hosting services above offer complimentary domain name registration for the first year of service, so if you’ve already completed Step 1, you already have your domain.
If you’re still deciding on which domain name to choose, here are a few tips to consider:
- Make it short and memorable: Shorter domain names are easier to remember. The title should be something that sticks in people’s minds. Long domain names only work if they’re unique and catchy.
- Use relevant keywords: Your domain name is another opportunity to incorporate keywords that contribute to your overall SEO strategy. Keywords that are relevant to your business niche will make your domain name further stick out in people’s memory and boost your search engine rankings.
- Research domain names: Check to see if other companies or individuals are using a domain name that is too closely related, to avoid any conflicts or confusion.
- Choose the appropriate domain name extension: As you know from browsing the web, domain names can end in .com, .org, .biz, and other extensions. Pick the one that best fits the purpose of your website.
Now that you purchased your web hosting plan (and got your free domain with your hosting plan) you’re ready to build and launch your website.
Step 2: Choose a Site-Building Method
There are three main ways to build a website. If you’re a beginner, by far the easiest way to build and launch a site is to use a website builder provided by your web host. If you’re at least somewhat web-savvy, you could use use WordPress or a content management system (CMS) such as Drupal or Joomla. If you are already well-versed at coding, you can start from scratch and use HTML to build the site from the ground up. Each approach has its merits and challenges:
Option 1: Use a Site Builder (Beginner Level)
Using a website builder – an application that takes you through the steps of making a website without code – can be both liberating and empowering. All of the coding is done by the provider on the backend, and in essence, it’s not much more challenging than using a word processor.
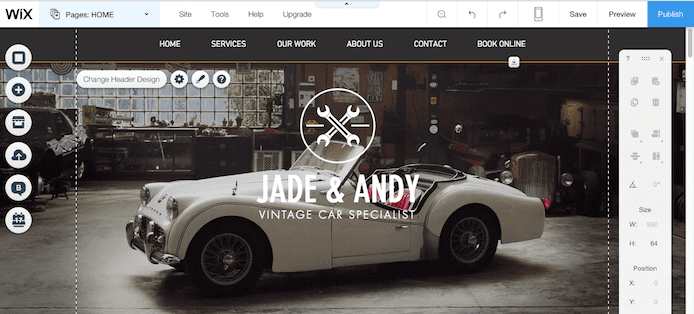
Website builders, like Wix, allow non-programmers to design web pages visually, without coding know-how.
Typically, a site builder or template-based site-building method offers fewer customization options than if you build the website from scratch using straight-up HTML, but for the limited skills required, site builders provide flexibility and a good user experience for newbies.
Option 2: Install WordPress (Intermediate Level)
Many business owners and employees have little to no coding skills. At the same time, it can be limiting for some to have to rely on a Web designer/developer to create a website and make updates. WordPress is a catch-all solution for businesses that want a basic website with minimal investment of time and money.
Almost one-third of all websites on the internet exist on the WordPress platform, and even big companies, like CNN and eBay, use it. There are free and paid versions of the software, and there’s plenty of user support available online.
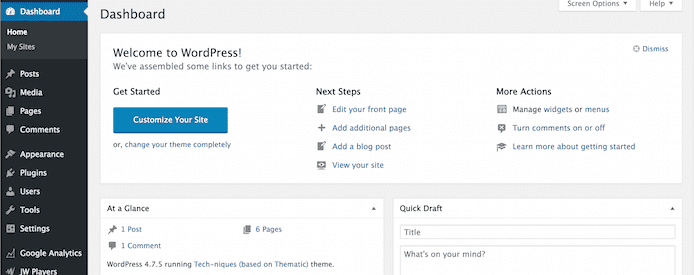
I love the WordPress dashboard for its sleek, clean design. Once you befriend it, you’ll never go back.
With many themes and layouts to choose from and options to advance to more complex designs and features, WordPress is a versatile choice for all kinds of businesses. In fact, it’s the platform that powers HostingAdvice.com itself.
Option 3: Create a website from scratch with HTML (Advanced Level)
Web design skills are highly valuable in the job market and maybe you’ve thought it’s something you want to pick up. Building a website from scratch will give you the tools to create and customize a site exactly as you see fit. There’s a higher learning curve but a greater reward, as knowing HTML will allow you to fine-tune your site design and carry those skills forward to expand and update the site with ease.
If you’re a programming novice and determined to learn, you can pick up the coding skills you’ll need from a myriad of web design books (the O’Reilly series is a good starting place) and websites like the World Wide Web Consortium (W3C) Schools.
Learning to code a site yourself will give you the ultimate flexibility in making it exactly what you want over time. Not to mention, being able to code is a very valuable skillset in today’s economy.
Step 3: Start Building!
Now that you’ve signed up for web hosting with a free domain, and chosen your sitebuilding method, you are ready to start creating the look of your site and its content. Read on for step-by-step instructions:
Option 1: Using a Sitebuilder to Build Your Site (Beginner)
Building a website with a free website builder is a quick, easy, and straightforward process. You may have already signed up for a hosting account in Step 1, in which case your web host’s site will have specific step-by-step instructions for you to install and use your free, included website builder. Generally, we find that Wix is the most popular website builder, so we will use it as the example here.
If you already signed up for hosting, you’ve created an account. If you don’t already have a web host, we recommend signing up for the Wix sitebuilder via its website. Simply enter your email address and password at the Wix.com signup page to begin. Note that the email address handle will become part of your free domain (if you don’t have a custom domain), so keep that in mind when signing up. If you’re still unsure, I welcome you to check out our expert review of the Wix platform below.
Wix.com

- No coding skills needed with drag-and-drop builder
- 100s of templates with niche-specific designs
- Add features via the App Market and Wix Events
- Easily create ecommerce functionality easily
- Great way to build small sites on a budget
- Get started on Wix now.
Wix: Our Expert's Review
| Money Back Guarantee | Disk Space | Domain Name | Website Builder Hosting Plans |
|---|---|---|---|
| 14 days | 500 MB - 20 GB | Transfer | www.wix.com/site-builder |
Select the category that best describes your website. This helps people find your website and helps Wix cater to the platform’s diverse user base. Your selection will determine what kinds of templates you browse, so consider the best option for the style of site you want to build.
Wix now has two options for creating a website. In addition to the traditional Wix Editor, there’s also Wix ADI, an artificial intelligence program that designs custom sites based on questions you answer. We recommend using the Wix Editor, which gives you full control over the customizations available on the platform. However, if you want to try the Wix ADI, by all means, go for it!
Choose from a wide variety of templates, all different depending on the type of website you are creating. Filter options by image, search by keyword, or sort through the templates by category.
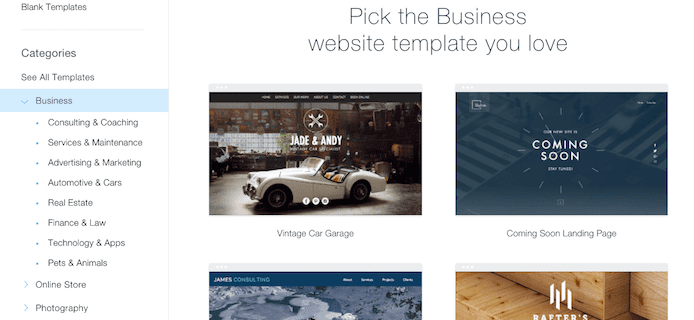
The wealth of industry- and niche-specific themes available in Wix is something I find particularly attractive.
You can also opt for a blank template to start completely from scratch or with a basic layout.
Each template starts with pre-filled text and a background image. Your template is a starting point to make the site your own. One of the first things you should do on your new Wix page is add your business information. Fill in your brand name, slogan, and other pertinent details by simply clicking on the text that needs to be replaced. You can also change the visual aspects of the page, including the background image, and add or swap out images on other pages on your site.
There are lots of ways to add content and customize your site. Click the Add button on the left-hand menu for a swath of options — text, buttons, slideshows, menus, et cetera. Under the Apps button, there are many features you can add to your site for additional functionality such as comments, live chat, and an online storefront. You can also upload your own multimedia content, such as fonts, images, videos, and music, and start a blog.
Simply click “Publish” in the right-hand corner to put your site up on the web! You’ll choose a domain, which can be a free domain from Wix.com or a customized domain you acquire via a domain registrar.
Option 2: Using WordPress to Create Your Site (Intermediate)
Using WordPress to create your site is a similar experience to using a website builder in terms of process. Which platform you should use is a matter of preference. It depends on which one feels most intuitive to you and gives you the most flexibility for your site design and maintenance. A big advantage of going with WordPress is the large community of support, both official and from other WP software users.
Most hosting plans include easy access to WordPress — installing the software with one click, or better yet, having it preinstalled for you. In most cases, you can simply log into your hosting control panel and find the option to install the WP platform. If your hosting service doesn’t have this capability, you can find the manual installation instructions here. These web hosts make installing WordPress especially easy:
1.
InMotionHosting.com

- WordPress pre-installed with NGINX and PHP 7
- FREE SSL certificate and unlimited bandwidth
- Optional automatic plugin, theme, and core updates
- Features a FREE drag-and-drop WP page editor
- Premium themes and plugin subscriptions
- Get started on InMotion now.
InMotion: Our Expert's Review
| Money Back Guarantee | Disk Space | Domain Name | WordPress Hosting Plans |
|---|---|---|---|
| 90 days | 40 GB SSD - 120 GB SSD | FREE (1 year) | www.inmotionhosting.com/wordpress |
2.
Bluehost.com
- Recommended by WordPress Core since 2005
- FREE SSD storage and SSL certificate
- FREE domain registration and email
- Automatic installation and updates
- 63% discount exclusively for HostingAdvice shoppers
- Get started on Bluehost now.
Bluehost: Our Expert's Review
| Money Back Guarantee | Disk Space | Domain Name | WordPress Hosting Plans |
|---|---|---|---|
| 30 days | 50 GB SSD - Unlimited | FREE (1 year) | www.bluehost.com/wordpress |
3.
A2Hosting.com
- FREE Cloudflare CDN and 1-click installs for WordPress
- Turbo Server, SSD speed boost, and optimized caching
- A2-optimized WP plugins for performance and security
- SSL certificates, PayPal integration, and 24/7 support
- FREE HackScan and KernelCare
- Get started on A2 Hosting now.
A2 Hosting: Our Expert's Review
| Money Back Guarantee | Disk Space | Domain Name | WordPress Hosting Plans |
|---|---|---|---|
| 30 days | Unlimited SSD | New or Transfer | www.a2hosting.com/wordpress |
Take some time to get acquainted with the WordPress backend for your account. You’ll find where to manage your posts, pages, and comments; change the site appearance; add site editors; and install plugins. Your dashboard has everything you’ll need to keep track of the content on your site and customize its look and feel.
Under the Appearance tab in the dashboard, you can select from a number of free themes (or opt to pay for one). Installing a theme is as simple as selecting “Install” and then “Activate” for the template you want. You can change your theme at any time without altering the other content on your site.
To add new pages to your site, select “Pages” and then “Add New.” You can make these pages part of your site’s navigation menu under the Menus option in the Appearance tab. To add posts (if you want a blog on your site), go to “Posts” and then “Add New.”
By default, WordPress will place your latest posts on your homepage. To select a specific page to serve as your homepage, choose “Settings” from the dashboard menu and then choose “Reading.” In the Front Page Displays section, opt for “A static page” and then select the page you’ve created as your homepage.
Plugins are extensions — not set up in WordPress by default — that add new features to your site. WordPress plugins can enhance your site’s functionality, help you achieve the goals you have for your site, and give your website visitors a better user experience.
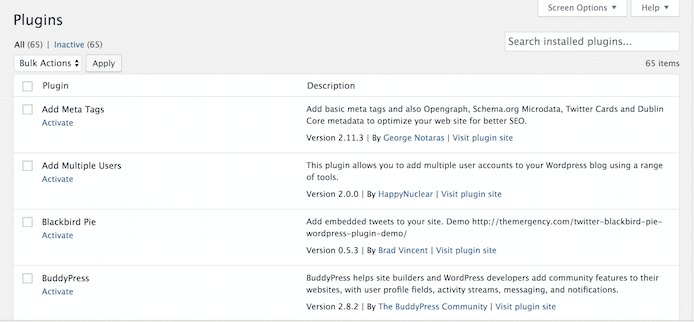
Plugins abound for WordPress users! Just download and install to extend the platform’s already-robust functionality.
For example, the Google Analytics plugin helps you track your site activity, and the NextGEN Gallery plugin lets you display image galleries. Under “Plugin” in the dashboard, you can search through the options — literally thousands of free plugins. Just click “install” and you’re good to go.
At this point, you’ll have created a content-filled, visually appealing and functional site. Publishing in WordPress happens on a page or post level, so you’ll need to click “Publish” for each area of your site. You can wait until your website is completely ready to launch to publish your content or publish as you create individual pages and posts.
Option 3: Use HTML to Make a Website from Scratch (Advanced)
For those who want a challenge and have a little extra time, making a website via HTML is a worthwhile endeavor that develops your understanding of web editing and design. You can set up a basic site in just a few hours, and build upon it as you learn more HTML and CSS skills.
As was the case with the first two website-building routes, your first step is to sign up with a hosting provider.
SiteGround.com

- FREE site transfer or new site setup with 1-click install
- FREE automated daily backups, CDN, email, and SSL
- 24/7 expert support with no wait time on phone or chat
- Recommended by WordPress as a top WordPress host
- Ideal for business email hosting, with 99.9% uptime
- Get started on SiteGround now.
SiteGround: Our Expert's Review
| Money Back Guarantee | Disk Space | Domain Name | Best Overall Hosting Plans |
|---|---|---|---|
| 30 days | 10 GB SSD - 30 GB SSD | New or Transfer | www.siteground.com |
To write HTML tags, you’ll need a high quality text editor that caters to the language of the web. Notepad++ is a good option for Microsoft users, while TextMate is ideal for Mac users. Cross-platform text editors include Atom and Sublime Text.
Websites can be built strictly using HTML, which translates into text files named with the extension .html. The main page of your site is typically titled index.html. Create this file and save it, then fill it in with the basic framework of your HTML site. It will look something like this:
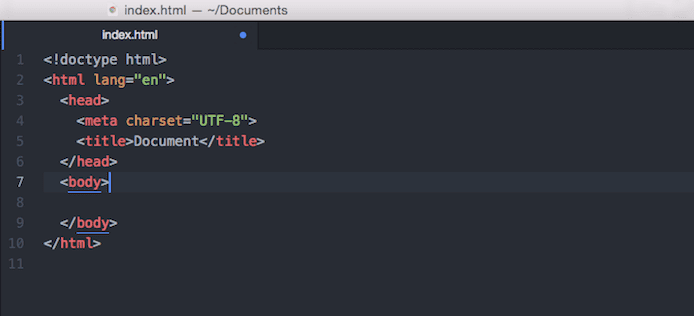
At its simplest, this is what your site’s main index page should look like when you’re drafting it up in your text editor.
<html> tags enclose the entirety of your site content and indicate that this is an HTML document. The <head> tag encompasses your page title, meta tags (tell the browser details about your page content and display), and references to your external CSS files for styling your page. The actual content of your page goes between the <body> tags.
When building your site, you’ll want to organize your files into folders according to the structure you want your site to appear in. For example, you might create a folder for your About page that has your main about.html file as well as any related CSS that adds style to your site and other HTML files that support that content. When adding links throughout your site to your site’s pages, you will reference their folder location in the directory where you store your files.
Write your content within the
<body> section of each .html file (i.e., each page) of your site. Here are a few important tags to know as you build out your site:<header>indicates the top of your document and is where your page title and logo appear.<nav>is used to build your site menu, the main navigation of your site where visitors find top-level site links.<section>denotes the main content of your page. It’s used to group like content within a page. Think of articles you find online that are grouped under individual headings.<article>is used for individual pieces of content on a page such as a blog post, image, video, or other multimedia. It’s a way to structure the page so these items can be easily distinguished.<footer>is the bottom of the website. This area is often where people put their contact information, terms of service, privacy policy, and other miscellaneous but important information.
Filled in with these tags, the basic structure of your page would look like this:
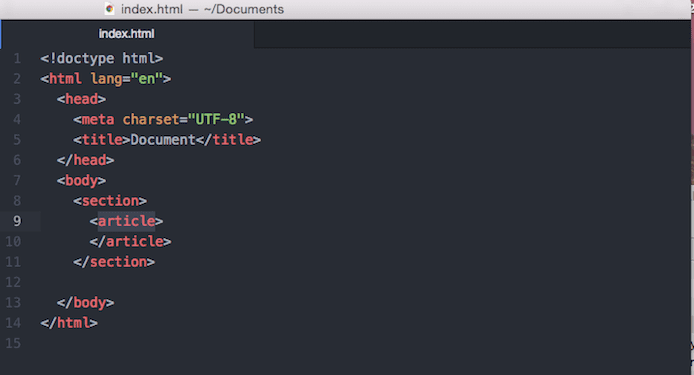
Complete with HTML tags, your website’s basic page structure should look something like this in your text editor.
You’ll also want to add a basic navigation bar for your site. This provides easy access to the main pages of your site. You’ll use the
<nav> tag and the <ul> or unordered list tag to set this up.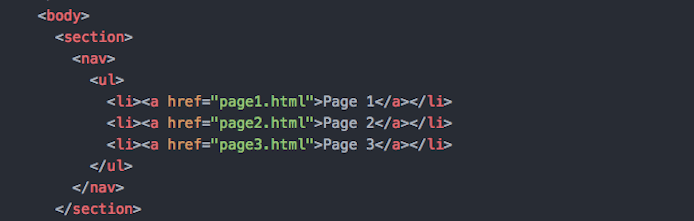
In HTML, your site’s main navigation is actually just an unordered (think bullets) list of URLs.
And voila! Now your site visitors can easily navigate to your blog, product pages, drop you a line on your contact page, browse customer testimonials, and back to the homepage again!
You can make your site more visually interesting with formatting, colors, and images only using HTML. However, incorporating CSS, or cascading style sheets, into your site gives you a lot more control over its appearance, and sites that use CSS look more professional overall.
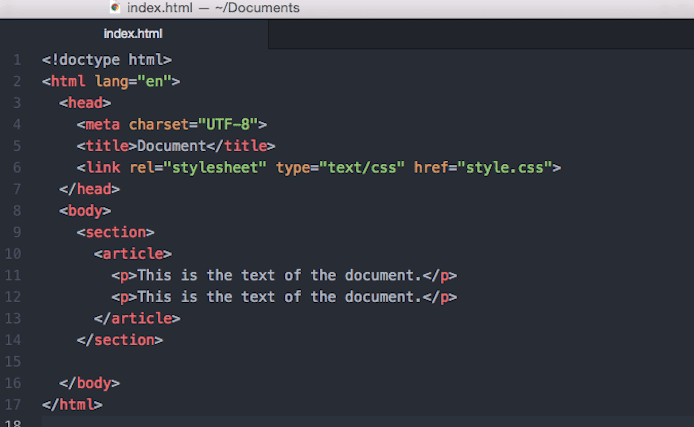
Add additional customization and design rules to your site using CSS files.
CSS is designated in separate CSS files. The main file is typically titled style.css. Some basic functions of CSS include adding colors, borders, and backgrounds, and applying the box model to organize the content on your pages. This step is more advanced than using basic HTML, but can greatly enhance the aesthetics of your site.
Once you’re happy with the overall layout, you can publish your site. It’s perfectly fine if your site is very basic to start out with. As long as it looks professional, you can feel good about putting it out on the web, and improve it as you develop more HTML and CSS skills.
Alll Done! Now for the Hard Part… Adding Content
As was the case for our event-planning friend, you may not think that you can build your own website at first — but the truth is it’s now easier than ever for the complete beginner to create a functional and visually appealing site that people want to visit. With the help of online resources and support from the WordPress community, my friend built a site she was proud of – and you can, too.
The most important thing to consider about your site is the content, as this will be what draws people to visit and keep reading. Consider what you want your site to be about, whether it’s your business or a blog on a specific topic. Consider carefully because this will determine your web design direction, too. Once you’ve got some content ideas and a concrete plan, you’re ready to start your site building adventure.


